The Best Fluffy Pancakes recipe you will fall in love with. Full of tips and tricks to help you make the best pancakes.
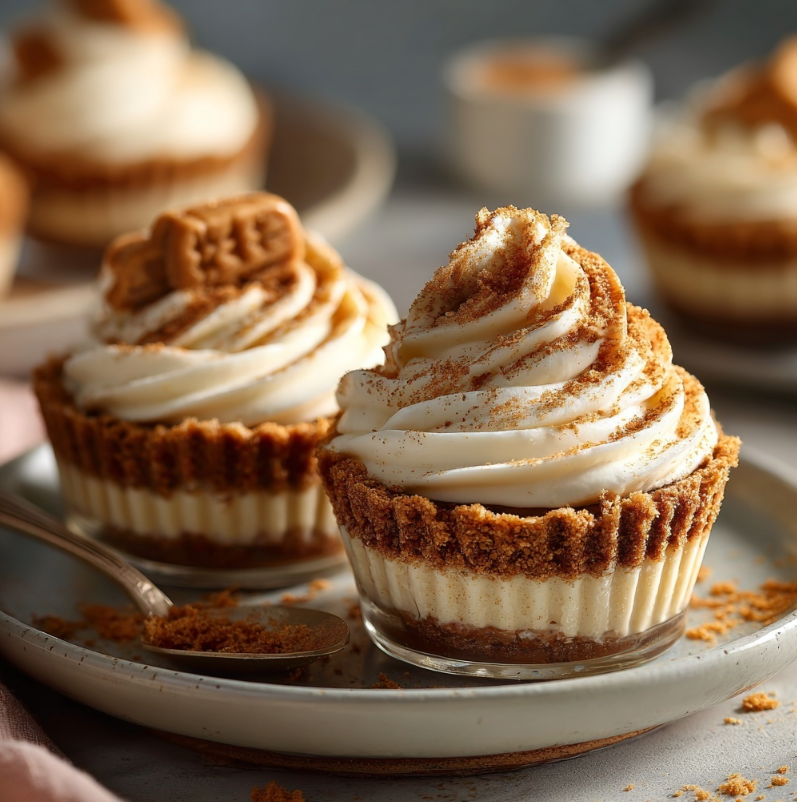
If you’re looking for a dessert that feels luxurious but requires almost zero effort, these No-Bake Lotus Biscoff Cheesecake Cups are about to become your new obsession. Creamy, rich, and packed with that signature caramelized biscuit flavor, this recipe is perfect for beginners, busy days, or when you simply want something impressive without turning on the oven.
These cheesecake cups are layered with a buttery biscuit base, a smooth and airy cheesecake filling, and finished with a glossy Biscoff topping that melts in your mouth. The best part? No baking required. Just mix, layer, chill, and enjoy.
Whether you’re making dessert for guests, building your Pinterest food content, or just treating yourself after a long day, this recipe checks every box: easy, aesthetic, and insanely delicious.
Why You’ll Love This Recipe
There are so many reasons why these No-Bake Lotus Biscoff Cheesecake Cups are a must-try:
- No oven needed – Perfect for hot days or small kitchens
- Quick prep – Only about 20 minutes of actual work
- Beginner-friendly – No complicated techniques
- Visually stunning – Perfect for social media or serving guests
- Rich Biscoff flavor – Sweet, spiced, and slightly caramelized
What Is Lotus Biscoff?
Lotus Biscoff is a spiced caramelized biscuit originally from Belgium. It has a deep, slightly cinnamon-like flavor with a crisp texture that makes it perfect for desserts. The spread version (similar to peanut butter) is what gives this cheesecake its signature creamy and indulgent taste.
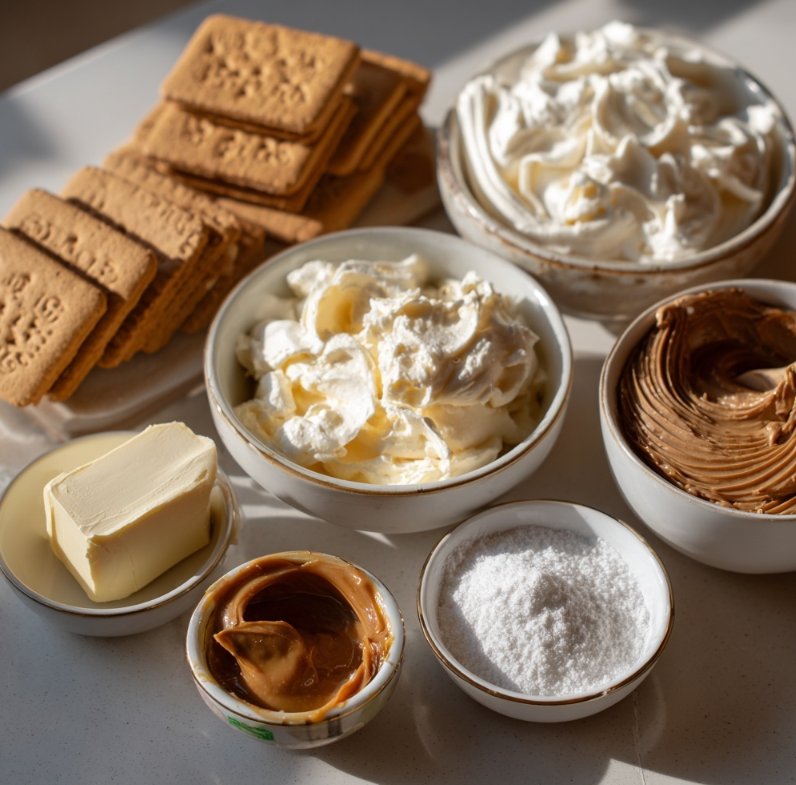
Ingredients
For the Biscuit Base
- 200g Lotus Biscoff biscuits
- 100g melted butter
For the Cheesecake Filling
- 300g cream cheese (room temperature)
- 200ml heavy whipping cream
- 100g powdered sugar
- 150g Lotus Biscoff spread
For the Topping
- 100g Lotus Biscoff spread (melted)
- Crushed biscuits for garnish
- Whole Lotus biscuits (optional)
Instructions
Step 1: Prepare the Biscuit Base
- Crush the Lotus biscuits into fine crumbs using a food processor or by placing them in a sealed bag and crushing with a rolling pin.
- Mix the crumbs with melted butter until fully combined.
- Spoon the mixture into serving cups and press it down firmly to form an even base layer.
- Place the cups in the fridge to chill while you prepare the filling.
Step 2: Make the Cheesecake Filling
- In a mixing bowl, beat the cream cheese until smooth and creamy.
- Add powdered sugar and mix until fully incorporated.
- Add the Biscoff spread and continue mixing until smooth.
- In a separate bowl, whip the heavy cream until soft peaks form.
- Gently fold the whipped cream into the cream cheese mixture until light and fluffy.
Step 3: Assemble the Cheesecake Cups
- Remove the chilled biscuit bases from the fridge.
- Spoon or pipe the cheesecake filling evenly into each cup.
- Smooth the tops with a spoon or spatula.
Step 4: Add the Topping
- Melt the Biscoff spread slightly until pourable.
- Pour a thin layer over each cheesecake cup.
- Garnish with crushed biscuits or a whole Lotus biscuit.
Step 5: Chill and Serve
- Refrigerate the cheesecake cups for at least 2–4 hours, or until set.
- Serve chilled and enjoy every creamy bite.
Tips for Perfect Cheesecake Cups
- Use room temperature cream cheese to avoid lumps
- Don’t overmix the whipped cream—keep it light and airy
- Chill properly—this helps the cheesecake set perfectly
- Use clear cups for a beautiful layered presentation
Variations You Can Try
Want to customize your cheesecake cups? Here are some ideas:
Chocolate Biscoff Cheesecake
Add melted chocolate to the filling for a richer flavor
Mini Cheesecake Jars
Perfect for selling or gifting
Biscoff & Banana Combo
Layer sliced bananas between the base and filling
Nutty Twist
Add crushed hazelnuts or almonds for texture
Serving Suggestions
These cheesecake cups are incredibly versatile. You can serve them:
- As a dinner party dessert
- During Ramadan or special occasions
- As a quick weekend treat
- In small jars for a business idea (perfect for your e-commerce goals 👀)
Storage Tips
- Store in the fridge for up to 3 days
- Keep covered to maintain freshness
- Do not freeze (texture may change)
Fun Fact
Biscoff biscuits were originally served with coffee on airplanes—hence the name “Biscoff” (biscuit + coffee). Now, they’ve become one of the most viral dessert ingredients worldwide!
Final Thoughts
These No-Bake Lotus Biscoff Cheesecake Cups are the definition of effortless luxury. They’re creamy, rich, visually stunning, and incredibly easy to make. Whether you’re creating content for Pinterest, impressing guests, or just treating yourself, this recipe delivers every time.
If you’re trying to grow a food account or even start selling desserts locally in Agadir, this is exactly the kind of recipe that goes viral—simple, aesthetic, and universally loved.
No-Bake Lotus Biscoff Cheesecake Cups
Creamy no-bake cheesecake cups layered with Lotus Biscoff biscuits and rich caramelized spread.
Ingredients
Equipment
Method
- Crush biscuits and mix with melted butter, then press into cups.
- Beat cream cheese, sugar, and Biscoff spread until smooth.
- Fold in whipped cream, layer into cups, top with melted Biscoff, and chill.
Notes
Chill at least 2–4 hours for best texture. Use clear cups for presentation.