The Best Fluffy Pancakes recipe you will fall in love with. Full of tips and tricks to help you make the best pancakes.
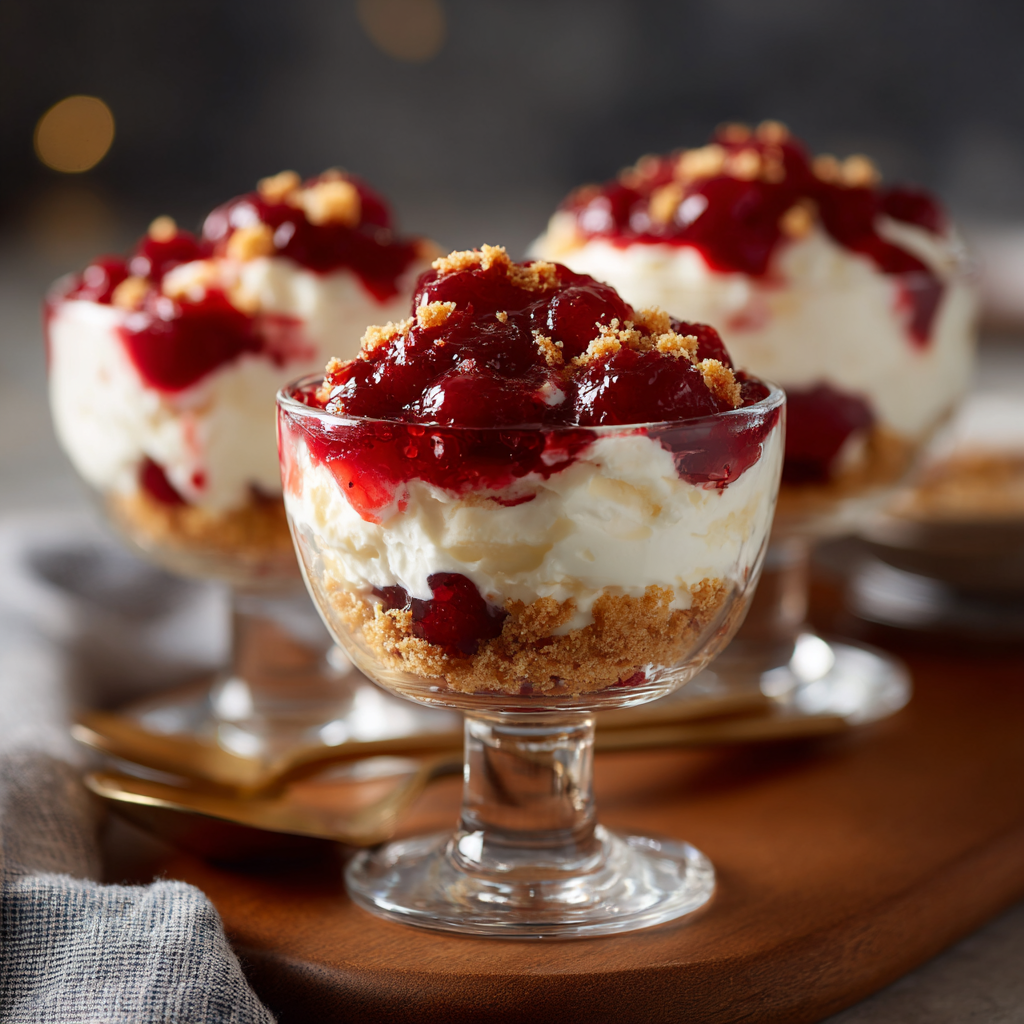
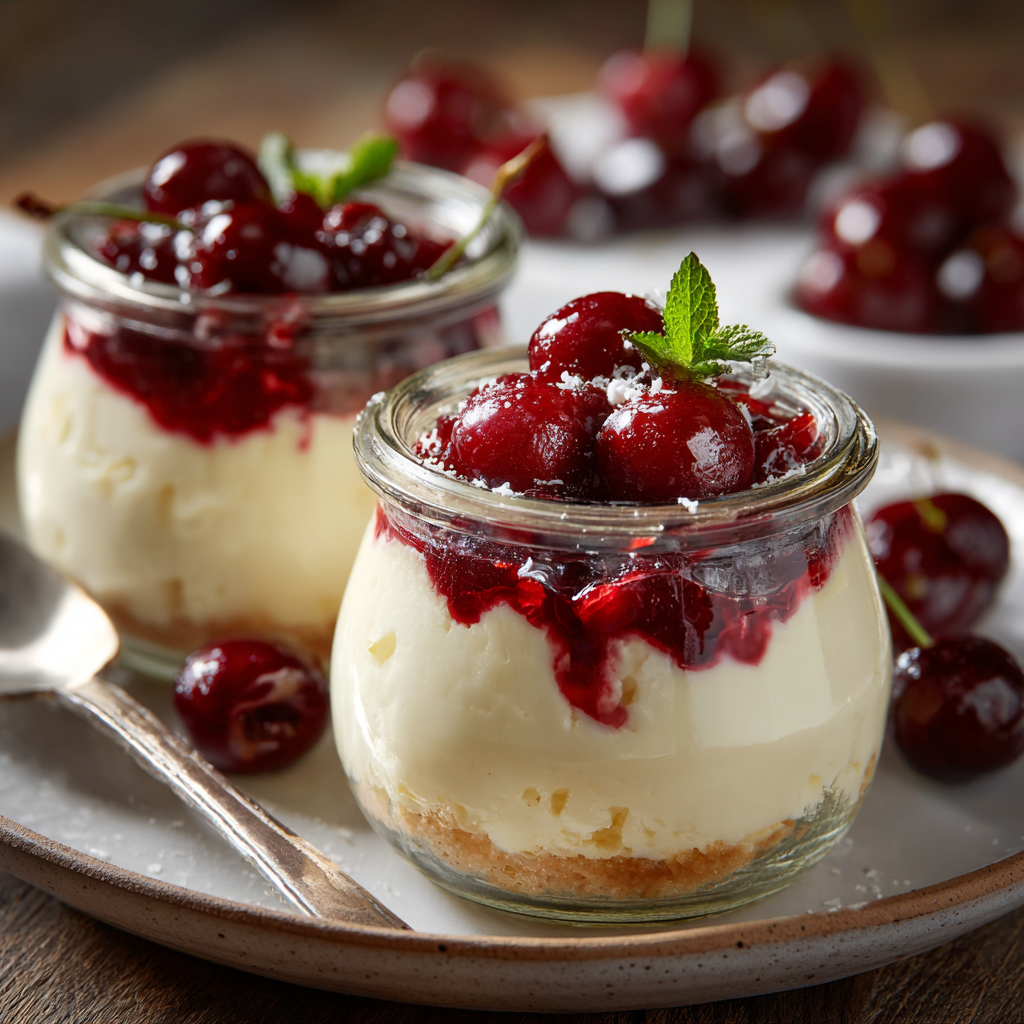
If you’re searching for a quick, elegant, and incredibly satisfying dessert, these Cherry Cream Cheese Dessert Cups are exactly what you need. With layers of creamy cheesecake filling, buttery crushed graham crackers, and sweet-tart cherry topping, this no-bake dessert is perfect for any occasion—from casual family dinners to festive celebrations.
The best part? You don’t need an oven, fancy tools, or advanced baking skills. These mini dessert cups come together effortlessly, making them a go-to recipe for beginners and seasoned home cooks alike.
In this detailed guide, you’ll learn everything you need to know about making the perfect cherry cream cheese dessert cups, including expert tips, variations, and serving ideas.
Why You’ll Love Cherry Cream Cheese Dessert Cups
There are countless reasons why this recipe stands out:
- No baking required – Perfect for warm days or quick desserts
- Quick preparation – Ready in under 30 minutes of active time
- Individual servings – Great for portion control and presentation
- Crowd-pleasing flavor – Creamy, sweet, and slightly tangy
- Customizable – Easily adaptable with different toppings and flavors
These dessert cups combine the rich taste of cheesecake with the simplicity of a layered parfait, giving you the best of both worlds.
Ingredients
Main Components
- 2 cups crushed graham crackers
- 6 tablespoons melted butter
- 2 tablespoons granulated sugar
Cream Cheese Filling
- 400 g (14 oz) cream cheese, softened
- 1 cup powdered sugar
- 1 teaspoon vanilla extract
- 1 cup whipped cream (or whipped topping)
Cherry Topping
- 1 can (about 400 g) cherry pie filling
- Fresh cherries (optional, for garnish)
Instructions
Step 1: Prepare the Crust
- In a mixing bowl, combine crushed graham crackers, melted butter, and granulated sugar.
- Mix until the texture resembles wet sand.
- Spoon about 2 tablespoons of the mixture into the bottom of each dessert cup.
- Press down gently to form a firm base.
Step 2: Make the Cream Cheese Filling
- In a large bowl, beat the softened cream cheese until smooth and creamy.
- Add powdered sugar and vanilla extract, then mix until fully combined.
- Gently fold in the whipped cream until the mixture is light and fluffy.
Step 3: Assemble the Dessert Cups
- Spoon or pipe a layer of cream cheese filling over the crust.
- Add a generous layer of cherry pie filling on top.
- Repeat layers if your cups are tall enough.
Step 4: Chill and Serve
- Refrigerate the dessert cups for at least 1–2 hours to set.
- Garnish with fresh cherries if desired.
- Serve chilled and enjoy!
Tips for Perfect Dessert Cups
Use Room Temperature Cream Cheese
This ensures a smooth, lump-free filling. Cold cream cheese can create a grainy texture.
Don’t Skip Chilling Time
Chilling helps the layers firm up and enhances the flavor.
Use Clear Cups
Transparent cups showcase the beautiful layers, making the dessert visually appealing.
Adjust Sweetness
Taste the filling before assembling. You can reduce or increase sugar depending on your preference.
Delicious Variations
One of the best things about this recipe is how versatile it is.
Berry Mix Dessert Cups
Swap cherry topping with strawberries, blueberries, or raspberries for a mixed berry version.
Chocolate Cherry Delight
Add a layer of chocolate ganache or chocolate chips between layers for a richer flavor.
Lemon Cream Cheese Cups
Add lemon zest and a splash of lemon juice to the filling for a refreshing citrus twist.
Oreo Crust Version
Replace graham crackers with crushed Oreo cookies for a chocolatey base.
Serving Suggestions
These cherry cream cheese dessert cups are perfect for:
- Birthday parties
- Holiday gatherings
- Potlucks
- Romantic dinners
- Afternoon treats
Serve them in small mason jars, dessert glasses, or even disposable cups for easy cleanup.
Storage Tips
- Refrigerator: Store covered for up to 3 days
- Freezer: Freeze for up to 1 month (thaw in fridge before serving)
- Make Ahead: Prepare a day in advance for best flavor
Nutritional Overview (Approximate per serving)
- Calories: 320
- Carbohydrates: 35g
- Protein: 4g
- Fat: 18g
- Sugar: 22g
Fun Facts About Cheesecake Desserts
Did you know cheesecake dates back to ancient Greece? While traditional cheesecake is baked, modern no-bake versions like these dessert cups have become popular for their simplicity and convenience.
Cherry topping is also a classic pairing with cheesecake due to its balance of sweetness and acidity, making it one of the most beloved dessert combinations worldwide.
Why This Recipe Works
This recipe succeeds because of its balance:
- Texture: Crunchy base + creamy filling + juicy topping
- Flavor: Sweet, tangy, and rich
- Ease: Minimal effort with maximum reward
Even if you’re new to dessert-making, this recipe is nearly foolproof.
Final Thoughts
Cherry Cream Cheese Dessert Cups are more than just a dessert—they’re a quick solution for satisfying sweet cravings without stress. Whether you’re hosting guests or simply treating yourself, this recipe delivers elegance, flavor, and convenience in every bite.
Once you try it, it’s bound to become a staple in your dessert rotation.
Cherry Cream Cheese Dessert Cups
A no-bake layered dessert with creamy cheesecake filling, graham cracker crust, and cherry topping.
Ingredients
Equipment
Method
- Mix crushed graham crackers with melted butter and press into serving cups.
- Beat cream cheese, sugar, and vanilla, then fold in whipped cream.
- Layer filling and cherry topping, then chill before serving.
Notes
Chill for at least 1–2 hours for best texture and flavor.