The Best Fluffy Pancakes recipe you will fall in love with. Full of tips and tricks to help you make the best pancakes.
Introduction
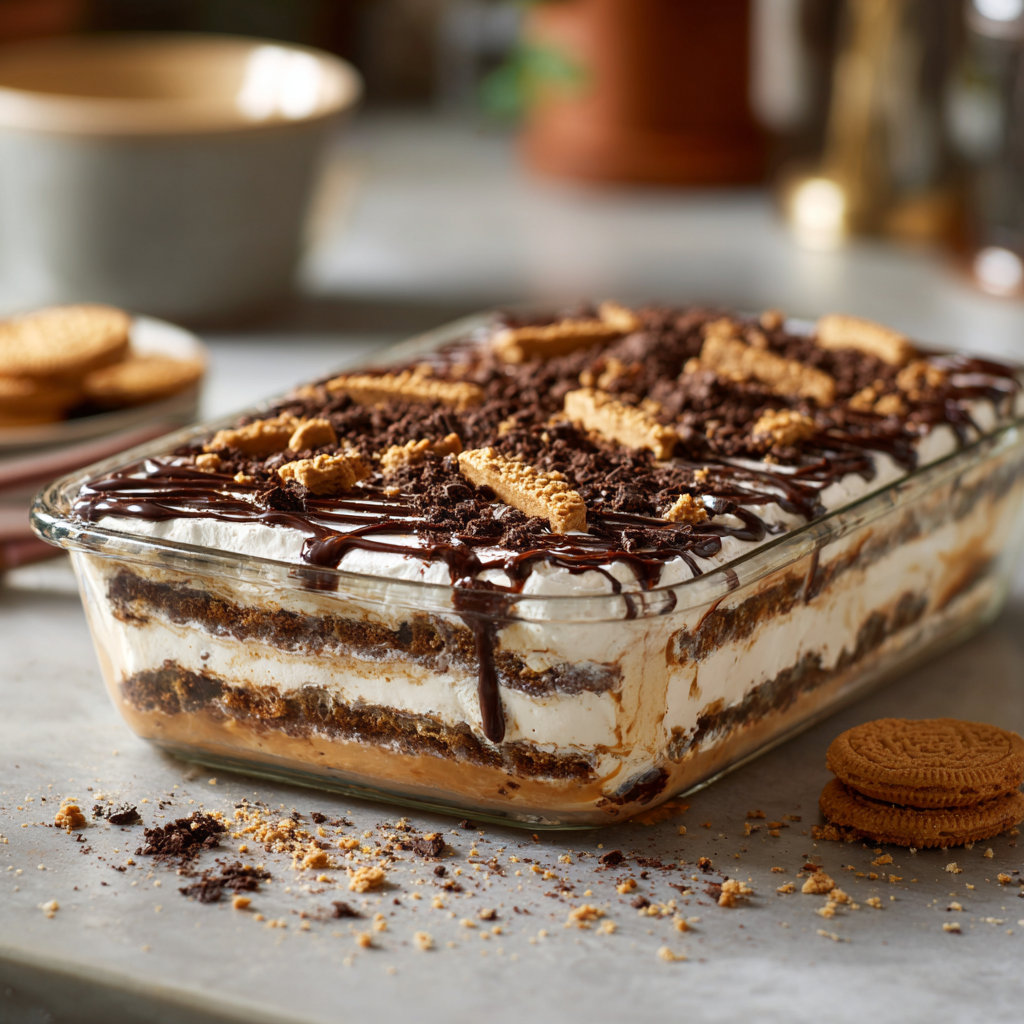
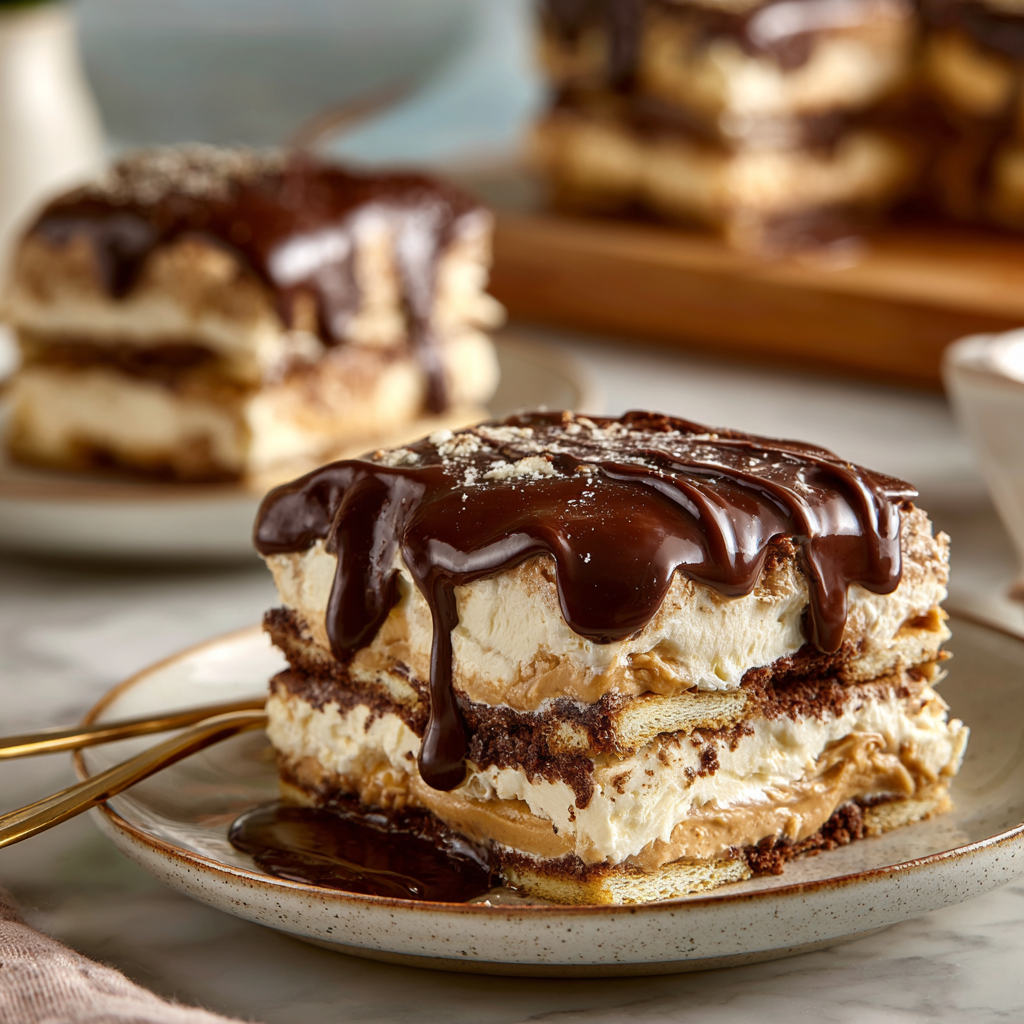
There’s something almost magical about an icebox cake. No complicated baking techniques, no worrying about oven temperatures, and absolutely no stress. Just layers upon layers of creamy filling, chocolate goodness, and biscuits that soften overnight into a cake-like texture that tastes like it came straight from a bakery display case.
This Peanut Butter Dream Icebox Cake is the kind of dessert people quietly sneak seconds of when nobody’s looking. It combines rich chocolate cream, silky peanut butter filling, and tender chocolate biscuits that melt into each other after chilling. The result is cool, creamy, decadent, and unbelievably satisfying.
What makes this recipe truly special is the balance. The peanut butter adds a salty, nutty depth that keeps the dessert from becoming overly sweet, while the chocolate layers bring richness and a smooth cocoa flavor. Every bite tastes like a mix between a peanut butter cup and a chilled mousse cake.
It’s also one of those desserts that somehow tastes even better the next day. The biscuits soften perfectly in the fridge, absorbing moisture from the filling and transforming into delicate cake-like layers. That’s why this dessert is ideal for holidays, family gatherings, summer dinners, or anytime you want a crowd-pleasing dessert without turning on the oven.
If you love easy no-bake desserts with luxurious texture and deep chocolate flavor, this recipe deserves a permanent spot in your kitchen rotation.
Why You’ll Love This Recipe
- Completely no-bake and beginner-friendly
- Rich peanut butter and chocolate flavor combination
- Perfect make-ahead dessert for parties and holidays
- Biscuits soften beautifully into cake-like layers
- Uses simple pantry ingredients
- Easy to customize with toppings and flavors
- Great for warm weather when you don’t want to use the oven
- Creamy, light texture with indulgent flavor
- Feeds a crowd with minimal effort
- Stores beautifully in the refrigerator
Ingredients
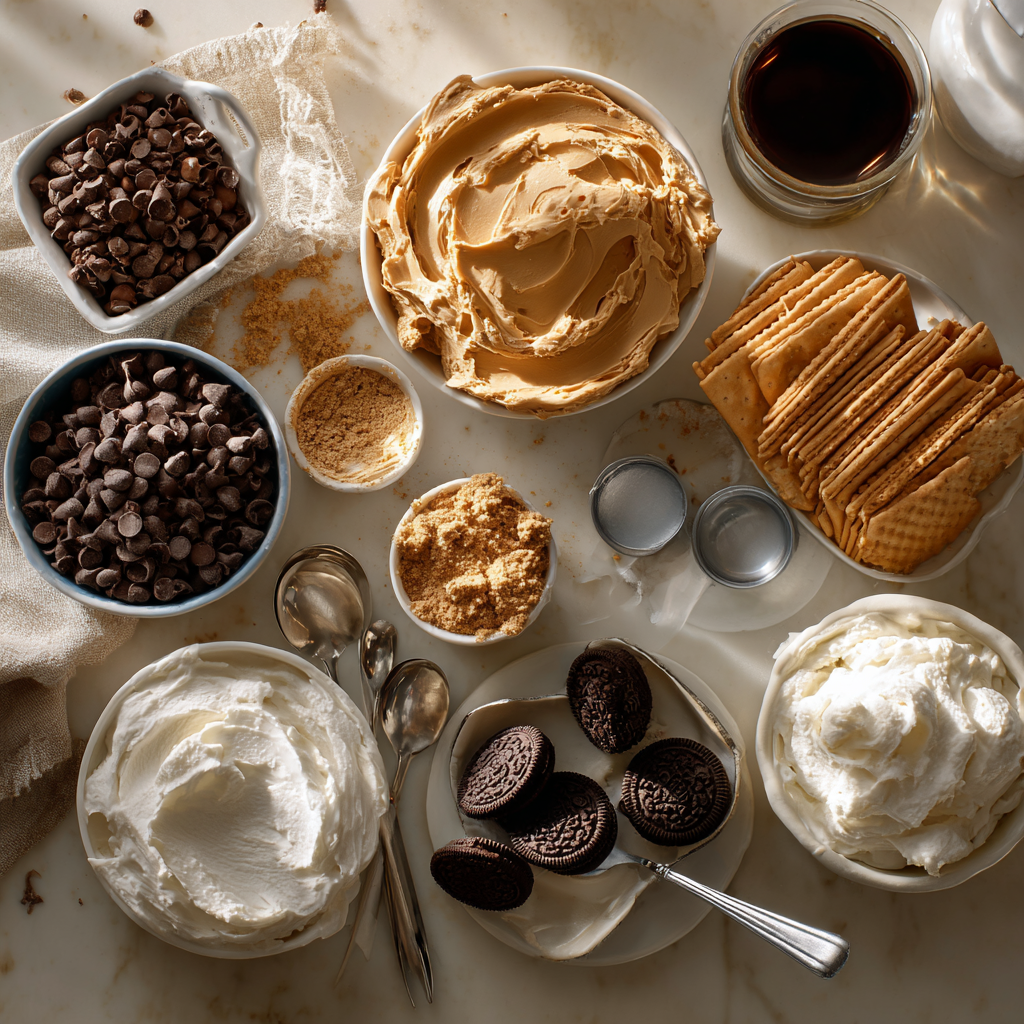
For the Peanut Butter Cream Filling
- 1 cup creamy peanut butter
- 8 oz cream cheese, softened
- 1 cup powdered sugar
- 1 teaspoon vanilla extract
- 2 cups heavy whipping cream, cold
For the Chocolate Layer
- 1 cup semi-sweet chocolate chips
- ½ cup heavy cream
- 2 tablespoons cocoa powder
For the Cake Layers
- 2 packs chocolate biscuits or chocolate graham crackers
- 1 cup milk for dipping biscuits lightly
For Garnish
- Chocolate shavings
- Crushed peanut butter cookies
- Melted chocolate drizzle
- Chopped roasted peanuts (optional)
Instructions
1. Prepare the Peanut Butter Filling
In a large mixing bowl, beat the softened cream cheese until smooth and fluffy. Add the peanut butter, powdered sugar, and vanilla extract. Continue mixing until creamy and fully combined.
In a separate chilled bowl, whip the heavy cream until stiff peaks form. Gently fold the whipped cream into the peanut butter mixture using a spatula. This creates a light, mousse-like filling that gives the cake its airy texture.
2. Make the Chocolate Ganache
Place the chocolate chips in a heatproof bowl. Heat the heavy cream until hot but not boiling, then pour it over the chocolate chips. Let it sit for two minutes before stirring until smooth and glossy.
Whisk in the cocoa powder for a deeper chocolate flavor. Allow the ganache to cool slightly before assembling the cake.
3. Prepare the Dish
Use a rectangular glass baking dish or deep serving dish. Lightly dip each chocolate biscuit into milk for just one second. Do not soak them completely or they’ll become too soft.
Arrange a single layer of biscuits across the bottom of the dish.
4. Add the Peanut Butter Layer
Spread a generous layer of peanut butter cream filling over the biscuits using an offset spatula or spoon. Smooth it evenly into the corners.
5. Add the Chocolate Layer
Drizzle or spread a thin layer of chocolate ganache over the peanut butter cream.
6. Repeat the Layers
Continue layering dipped biscuits, peanut butter filling, and chocolate ganache until the dish is full. Finish with a final thick layer of peanut butter cream on top.
7. Garnish the Cake
Decorate the top with chocolate shavings, crushed peanut butter cookies, chopped peanuts, and melted chocolate drizzle.
8. Chill Overnight
Cover the cake tightly and refrigerate for at least 8 hours, preferably overnight. This chilling time is essential because it allows the biscuits to soften into tender cake-like layers.
9. Slice and Serve
Use a sharp knife to cut clean squares or rectangles. Serve chilled for the best texture and flavor.
Pro Tips
Use Cold Heavy Cream
Cold cream whips faster and creates a more stable filling. Chill your mixing bowl for extra fluffy results.
Don’t Oversoak the Biscuits
A quick dip is enough. Over-soaked biscuits can make the cake too wet and mushy.
Chill Overnight for Best Texture
The transformation happens slowly in the fridge. Overnight chilling creates the perfect soft, sliceable texture.
Balance Sweetness Carefully
Natural peanut butter can reduce sweetness slightly, while commercial peanut butter creates a sweeter dessert. Adjust powdered sugar to taste.
Use Quality Chocolate
Since chocolate is a major flavor component, good-quality semi-sweet chocolate makes a noticeable difference.
Variations
1. Peanut Butter Cup Icebox Cake
Add chopped peanut butter cups between layers for extra texture and candy-like richness.
2. Oreo Peanut Butter Icebox Cake
Replace chocolate biscuits with Oreo cookies for a more intense cookies-and-cream flavor.
3. Salted Caramel Version
Drizzle salted caramel sauce between layers for a sweet-salty twist that pairs beautifully with peanut butter.
4. Frozen Icebox Cake
Freeze the cake for a firmer, ice cream cake-style dessert perfect for hot summer days.
5. Banana Peanut Butter Chocolate Cake
Add thin banana slices between layers for a nostalgic peanut butter-banana flavor combination.
Serving Suggestions
This Peanut Butter Chocolate Icebox Cake is rich enough to stand on its own, but a few thoughtful serving touches make it even better.
Serve chilled with:
- Fresh strawberries or raspberries for brightness
- Hot coffee or espresso
- Cold milk for a nostalgic dessert pairing
- Vanilla ice cream for extra indulgence
- A sprinkle of flaky sea salt to enhance the chocolate flavor
For dinner parties, serve slices on chilled dessert plates with a light cocoa dusting and extra chocolate drizzle.
Storage & Reheating
Refrigerator
Store covered in the refrigerator for up to 5 days. The texture actually improves after the first day.
Freezer
Freeze tightly wrapped slices for up to 2 months. Thaw in the refrigerator before serving.
Reheating
This dessert is meant to be served cold, so reheating is unnecessary. If frozen solid, allow it to sit at room temperature for 10–15 minutes before serving.
Common Mistakes to Avoid
Soaking Biscuits Too Long
This is the fastest way to create a soggy dessert. A quick dip is all you need.
Skipping Chill Time
The cake needs several hours to set properly. Cutting it too early leads to messy slices.
Using Warm Ganache
Hot ganache can melt the cream filling and create uneven layers.
Overmixing the Whipped Cream
Overmixed whipped cream becomes grainy and heavy instead of fluffy.
Uneven Layering
Try to spread each layer evenly for cleaner slices and balanced flavor in every bite.
Cultural Context and Fun Facts
Icebox cakes became wildly popular in America during the 1920s and 1930s, when refrigerators — commonly called “iceboxes” at the time — became household staples. Home cooks loved these desserts because they required no baking and relied on refrigeration to soften cookies into cake-like layers.
Traditional versions often used simple wafer cookies and whipped cream. Over time, creative variations appeared with chocolate, fruit, peanut butter, caramel, and even coffee flavors.
The genius of an icebox cake lies in texture transformation. Dry cookies absorb moisture from cream fillings over several hours, creating tender layers without any baking at all.
Peanut butter and chocolate became a classic American dessert pairing thanks to the popularity of peanut butter cups introduced in the early 20th century. Their sweet-salty flavor balance remains one of the most beloved dessert combinations today.
FAQs
Can I make this icebox cake ahead of time?
Absolutely. In fact, it tastes better after chilling overnight because the layers soften and develop flavor.
What biscuits work best?
Chocolate graham crackers, chocolate digestive biscuits, or chocolate wafer cookies all work beautifully.
Can I use crunchy peanut butter?
Yes, but the filling will have more texture. Creamy peanut butter creates a smoother mousse-like consistency.
Is this dessert overly sweet?
No. The peanut butter and semi-sweet chocolate balance the sweetness nicely.
Can I make it without cream cheese?
You can substitute mascarpone cheese or stabilized whipped cream, though cream cheese adds structure and slight tanginess.
How long does it last in the fridge?
It stays fresh for about 5 days when tightly covered.
Final Thoughts
This Peanut Butter Dream Icebox Cake proves that incredible desserts don’t need complicated techniques or hours in the kitchen. With just a few simple ingredients and some patience while it chills, you get a luxurious dessert filled with creamy peanut butter mousse, rich chocolate, and perfectly softened biscuit layers.
It’s nostalgic, comforting, and impressive enough for celebrations while still being easy enough for a casual weekend treat. One bite of those creamy chocolate-peanut butter layers and it’s easy to understand why icebox cakes have remained popular for generations.
Peanut Butter Dream Icebox Cake
A rich no-bake dessert layered with chocolate biscuits, creamy peanut butter filling, and silky chocolate ganache.
Ingredients
Equipment
Method
- Beat cream cheese, peanut butter, powdered sugar, and vanilla until smooth.
- Whip cold heavy cream until stiff peaks form and fold into peanut butter mixture.
- Prepare ganache by pouring hot cream over chocolate chips and stirring until smooth.
- Dip chocolate biscuits lightly in milk and layer them in a baking dish.
- Spread peanut butter filling over biscuits and drizzle with ganache.
- Repeat layers until the dish is full, finishing with cream on top.
- Garnish with chocolate shavings and chill overnight before serving.
Notes
For best texture, refrigerate overnight before slicing.